
Drawing a realistic face is one of the most rewarding artistic challenges. It allows you to capture human emotion and individual character. Many artists find it daunting at first. However, with the right guidance, anyone can learn these skills. This guide will help you unlock the secrets to portrait drawing.
We will break down the complex process into simple, manageable steps. You will discover how to establish correct proportions and render detailed features. Mastering shading techniques will add life to your creations. Get ready to bring your drawings to life with depth and emotion.
Essential Materials
Before starting your artistic journey, gather the right tools. Good materials make a significant difference. They help you achieve smoother results.
⊳ Pencils: Use a range like HB, 2B, 4B, and 6B. These create various light and dark values.
⊳ Paper: Choose a smooth drawing paper for better blending. A slightly textured paper can also work.
⊳ Erasers: A kneaded eraser is perfect for lifting graphite gently. A stick eraser helps with precise highlights.
⊳ Blending Tools: Paper blending stumps or tortillons help smooth out tones. Cotton swabs or even tissues can work too.
⊳ Reference Photos: Always use high-quality reference images. Look for clear lighting and detail.
Understanding Facial Proportions: The Foundation
Building a realistic face begins with establishing correct proportions. This provides a strong structural foundation. Ignoring proportions leads to distorted results.
► Starting with a Basic Shape:
⊳ Begin by drawing a light oval or egg shape for the head. This represents the skull.
⊳ Draw a vertical line down the center. This is your guide for symmetry.
⊳ Add a horizontal line halfway down the oval. This marks the approximate eye level.
► The Loomis Method Simplified:
⊳ Imagine a sphere for the cranium. Flatten its sides.
⊳ Attach the jawline. This helps visualize the head’s volume.
⊳ This method provides consistent guidelines for feature placement.
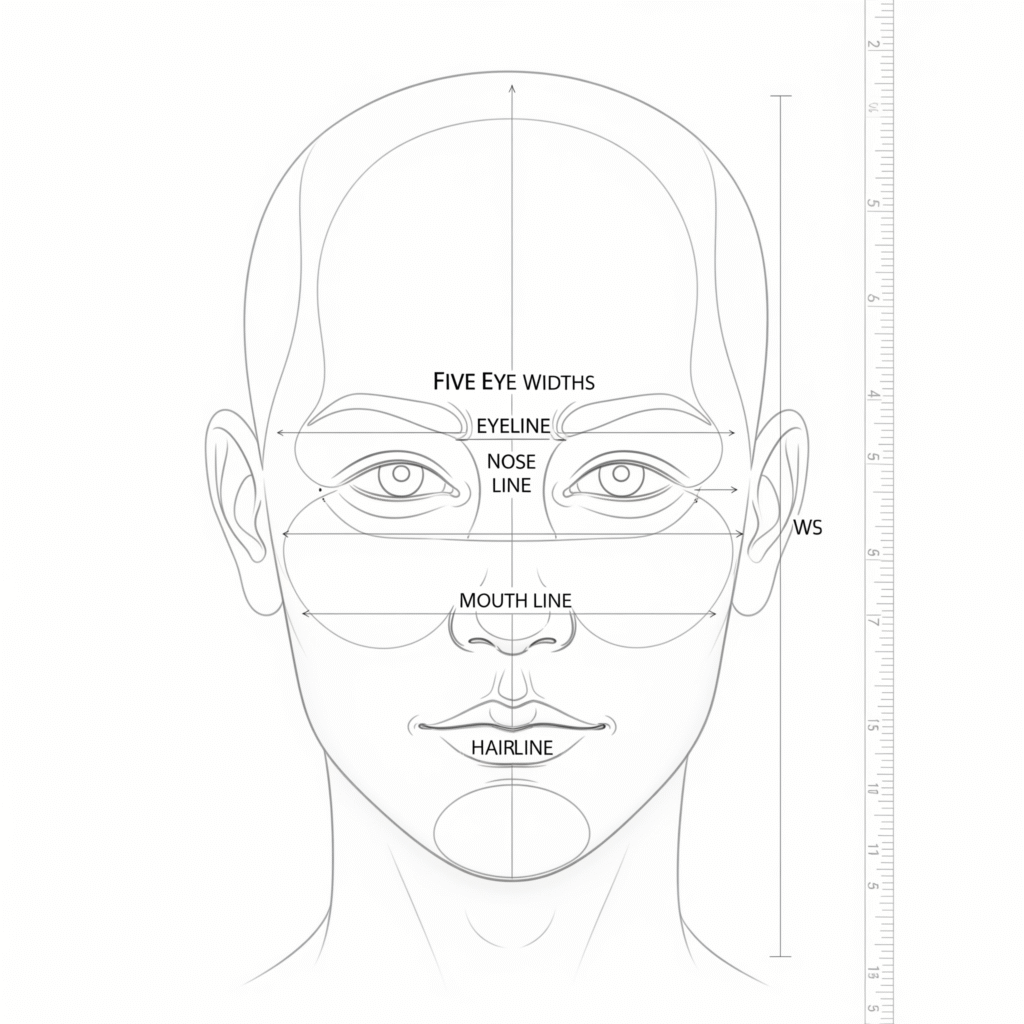
► Key Facial Divisions:
⊳ Eyeline: This line usually sits halfway down the head. It guides eye placement.
⊳ Nose Line: Find the midpoint between the eyeline and the chin. This is where the nose base rests.
⊳ Mouth Line: This is typically found halfway between the nose line and the chin. It marks the mouth’s center.
⊳ Hairline: The top quarter of the head usually contains the hairline. Leave space above the eyes.
►Head Width Rule:
⊳ The head’s width is roughly five “eye widths” across.
⊳ This includes the spacing between the eyes and to the temples.
⊳ Use this for a balanced face drawing tutorial.
► Embrace Variation:
⊳ Remember, these are general guidelines. Real faces are unique.
⊳ Observe your reference carefully. Adjust proportions as needed.
⊳ Subtle differences make a drawing unique.
Drawing Individual Features, Step by Step
Each feature contributes to the overall realism of your portrait drawing. Pay close attention to their unique shapes and forms.
► Realistic Eyes
Eyes are often called the windows to the soul. They convey emotion powerfully. Capturing them correctly adds immense life to your drawing.
⊳ Basic Shape and Placement:
» Sketch the general almond shape of the eye. Place it on the eyeline.
» Remember the “one eye width” space between the eyes.
» Lightly draw the eye socket area. This helps the eye “sit” naturally.
⊳ Iris and Pupil:
» Draw the iris as a circle within the almond shape. Part of it is often covered by the eyelids.
» The pupil is a smaller, darker circle in the center of the iris. It should be perfectly round.
⊳ Eyelids and Waterline:
» The upper eyelid is thicker and overlaps the iris more.
» The lower eyelid is thinner. It curves gently below the eye.
» Add a thin line for the waterline just inside the lower lid.
⊳ Tear Duct and Brows:
» Include the small tear duct in the inner corner.
» Eyebrows frame the eyes. Draw them following the direction of hair growth. Vary their density.
⊳ Highlights:
» Crucially, add a small, bright highlight on the iris. This creates a wet, reflective look.
» The highlight gives the eye sparkle and life.
If you enjoyed learning about faces, don’t miss our detailed guide on How to Draw a Pair of Realistic Eyes Step by Step.

► The Nose
The nose can be challenging due to its complex structure. Focus on planes and shadows rather than outlines.
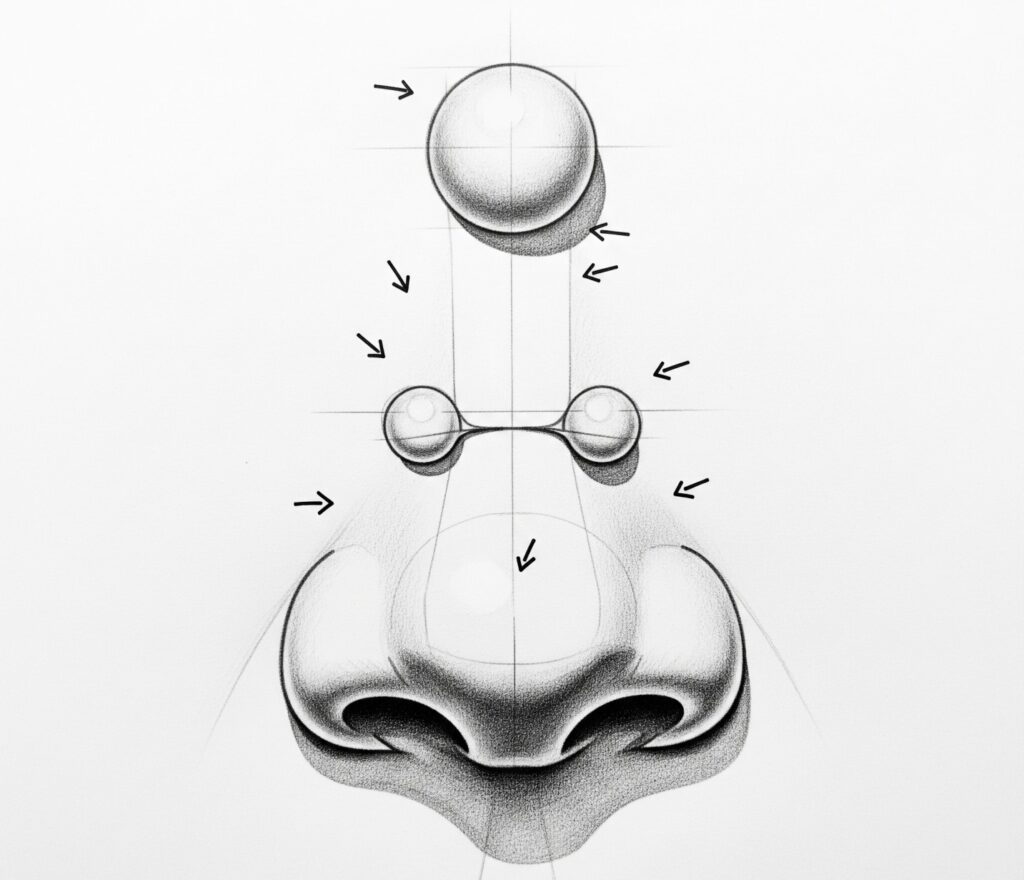
⊳ Basic Forms:
» Begin with a central sphere for the tip of the nose.
» Add two smaller spheres on either side for the nostrils.
» Connect these with simple lines to form the bridge.
⊳ Planes and Angles:
» Think of the nose as a series of flat planes. Light hits these planes differently.
» The bridge, tip, and nostrils each have distinct angles.
» Observe these angles in your reference.
⊳ Defining with Shading:
» Avoid drawing harsh outlines around the nose.
» Use subtle shading to define its form and structure.
» Darker values will be found under the tip and inside the nostrils.
► Lips and Mouth
Lips are highly expressive. They convey mood and character. Pay attention to their curves and volumes.
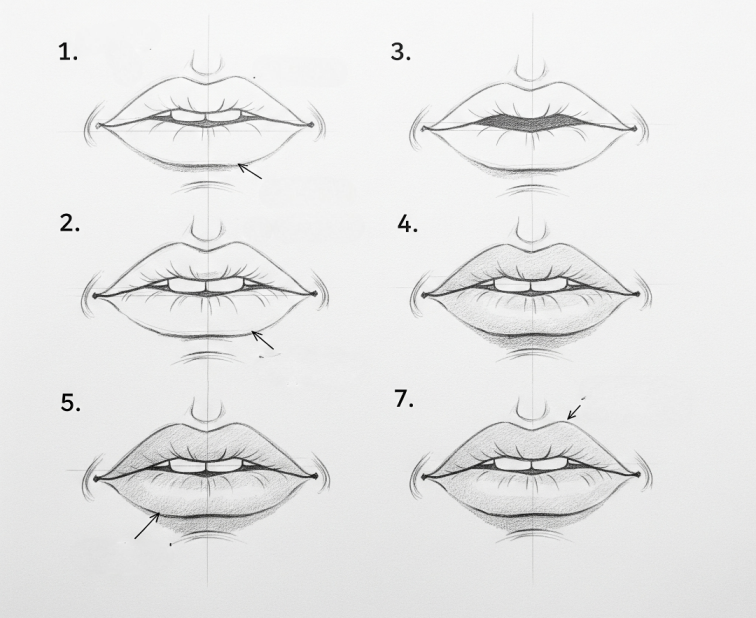
⊳ Center Line:
» Start with the center line of the mouth. This is where the lips meet.
» This line is often more defined than the outer lip edges.
⊳ Cupid’s Bow and Philtrum:
» Draw the cupid’s bow on the upper lip. This is the distinct double curve.
» The philtrum is the subtle groove above the cupid’s bow.
⊳ Volume and Curves:
» The upper lip typically has two distinct mounds. The lower lip is usually fuller.
» Observe the curves and the overall volume of the lips.
» The corners of the mouth can have subtle creases.
⊳ Expression:
» The mouth’s shape changes greatly with different expressions.
» Subtle shifts can communicate a lot. Practice drawing various expressions.
► The Ears
Ears are often overlooked but crucial for realism. Their placement varies slightly between individuals.
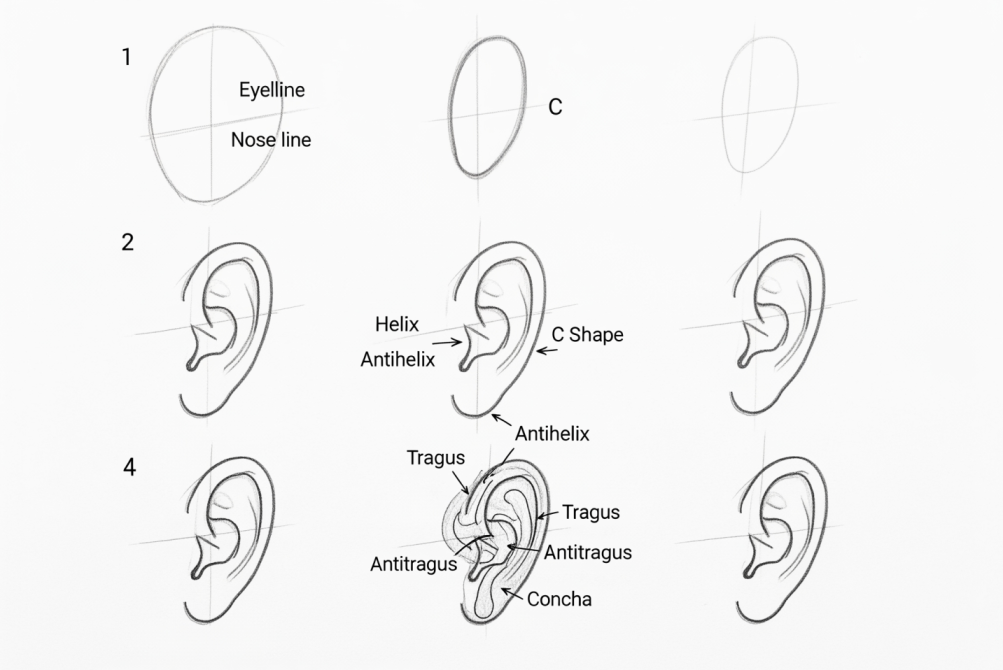
⊳ Placement:
» Generally, the top of the ear aligns with the eyeline.
» The bottom of the ear aligns with the nose line.
» This can vary depending on the person.
⊳ Basic Shape:
» Start with a simple “C” shape or a slightly elongated oval.
» Inside, add the helix (outer rim) and antihelix (inner ridge).
» Include the tragus, antitragus, and concha (bowl-like depression).
⊳ Perspective:
» Ears change shape significantly with head angle.
» Draw them in perspective to match the face’s orientation.
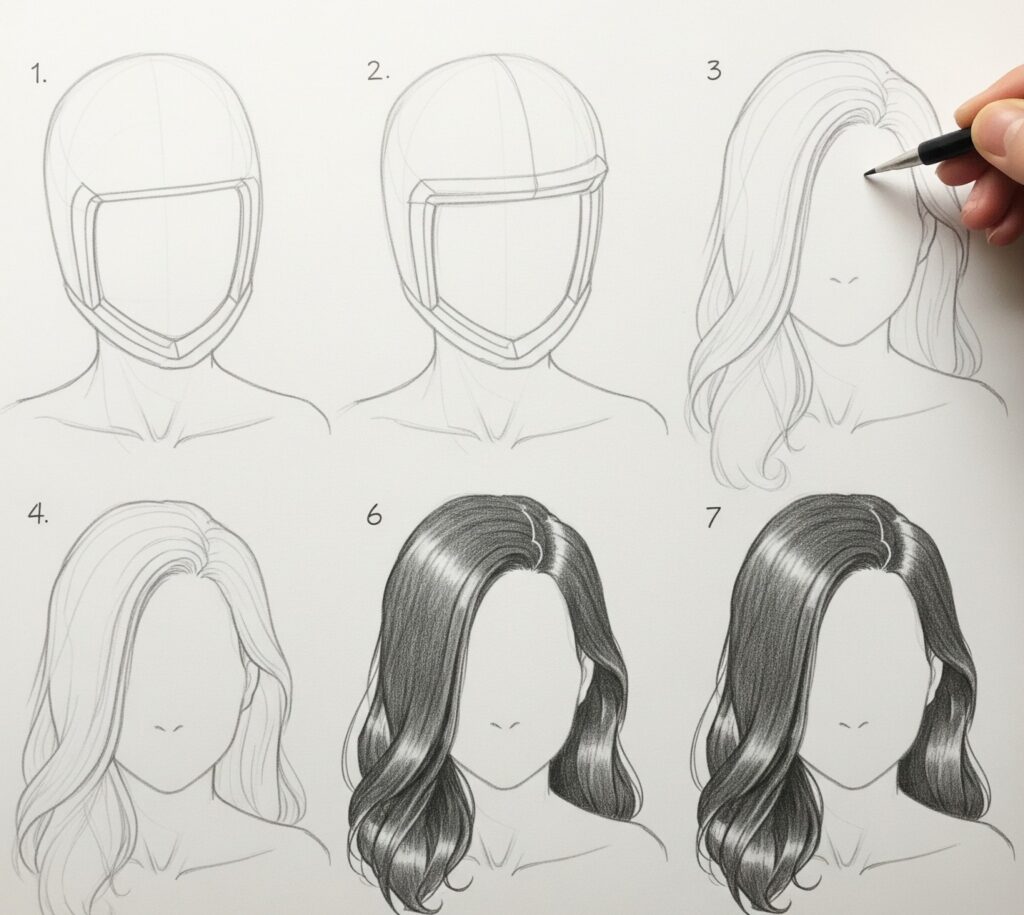
► Hair: Flow and Form
Drawing individual strands of hair is tedious and often unrealistic. Focus on masses and volume.
⊳ Treat as Shapes:
» First, draw the overall shape and volume of the hair.
» Think of it as a helmet or a large mass surrounding the head.
⊳ Direction of Growth:
» Pay attention to how the hair flows from the scalp.
» Observe the part and the natural curves.
⊳ Highlights and Shadows:
» Use broad strokes to create areas of light and shadow.
» These values will define the hair’s form and texture.
» Avoid drawing every single strand. Imply detail.
► Adding Depth and Dimension: Shading and Form
Shading transforms a flat drawing into a three-dimensional form. Understanding light is crucial for realism.
⊳ Understanding Light and Shadow:
» Identify your light source. This dictates where shadows fall.
» Cast Shadows are sharp shadows thrown by an object.
» Form Shadows define the curves and contours of the face.
» Look for highlights (brightest areas) and core shadows (darkest areas).
⊳ Planes of the Face:
» The face is not a smooth sphere. It has many planes.
» The forehead, cheekbones, nose bridge, and chin all have distinct planes.
» Shade these planes according to how light hits them.
⊳ Blending Techniques:
» Use blending stumps or tissues to create smooth transitions.
» This gives the skin a soft, realistic appearance.
» Avoid smudging areas intended to be sharp.
⊳ Building Values Gradually:
» Apply graphite in light layers. Build up darker values slowly.
» This prevents accidental dark spots. It also allows for corrections.
» Rich, layered values add depth.
⊳ Edges:
» Vary your edges. Some areas are sharp (e.g., side of the nose).
» Others are softer (e.g., transitions on the cheek).
» Soft edges create a sense of realism.
Bringing Life to Your Drawing: Expressions and Nuances
Beyond structure and shading, subtle details breathe life into your portrait. These nuances capture personality.
► Muscles of Expression:
⊳ Understand how underlying facial muscles affect the skin’s surface.
⊳ A slight lift of an eyebrow or a subtle smirk changes everything.
⊳ Practice observing these muscular movements.
► Subtle Details:
⊳ Add faint lines around the eyes or mouth, if present.
⊳ Consider adding subtle freckles, moles, or skin texture.
⊳ These small details make the face unique and authentic.
► The Gaze:
⊳ The direction of the iris and pupil creates the gaze.
⊳ Ensure both eyes look in the same direction for a natural look.
⊳ This brings a sense of focus to your face drawing tutorial.
► Asymmetry:
⊳ Real faces are rarely perfectly symmetrical. Embrace slight variations.
⊳ A perfectly symmetrical face can appear unnatural or stiff.
Common Mistakes to Avoid
Being aware of common pitfalls can greatly improve your progress.
» Making features perfectly symmetrical.
» Outlining every feature too harshly.
» Ignoring the underlying skull and anatomy.
» Drawing generic faces instead of unique individuals.
» Lack of variety in light and dark values.
Continuing Your Artistic Journey
Drawing realistic faces is a journey of observation and practice. Each portrait you create will teach you something new. Don’t be afraid to experiment with different styles and techniques. The more you draw, the more confident and skilled you will become.
Remember that tools can greatly assist your artistic process. Consider using apps that help with grid drawing or even photo to sketch conversion. These can be invaluable for studying proportions and form. For instance, GridSketcher is a free drawing app that can help you with these tasks. Keep practicing, and enjoy the incredible process of bringing your visions to life.
