Have you ever tried to draw something you see? Perhaps a simple object, or maybe a person. Did it look stiff? Or maybe it just didn’t quite look right? Many artists face this challenge. You know what a hand looks like. But drawing one can be incredibly difficult.
This common struggle often comes from one place. We draw what our brain thinks it sees. We rarely draw what our eyes truly perceive. This is where observational drawing comes in. It is the fundamental skill of drawing directly from real life. This post will explore this core practice. We will show you why it is so important. We will also give you tools to master it. Mastering observational drawing is a huge accelerator. It improves all other art forms. This includes imagination and digital art. Let’s sharpen our artist’s eye together.
The Core Pillars of Observation
Observational drawing is not just one skill. It is a combination of powerful techniques. These teach your brain to truly see. Each pillar is crucial for accuracy. Together, they create realistic and compelling drawings.
1. Proportion and Measurement
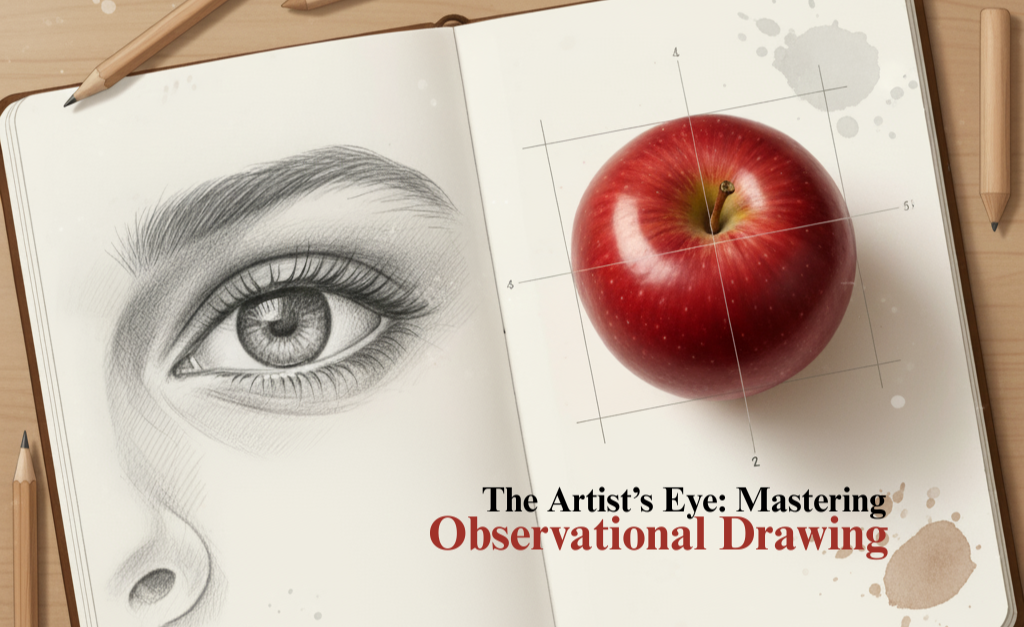
Getting proportions right is vital. It means correctly judging size relationships. For example, how long is an arm compared to the torso? Or how wide is a cup versus its height? Our brains often trick us here. They make us assume sizes.
To fight this, artists use simple methods. Sighting is one key technique. You hold up your pencil or brush. You can measure distances and angles with it. You then compare these measurements across your subject. This ensures parts relate correctly. Looking at the negative space also helps. This is the empty space around the object. Its shape is as important as the object’s shape. Measuring this helps confirm your main object’s proportions. Always remember, accuracy in size builds a strong foundation.
2. Value (Light & Shadow)
Value refers to the lightness or darkness of tones. It is not just about black and white. Value creates the illusion of three-dimensional form. It is how we see depth on a flat page. Without good values, drawings look flat.
There are six main zones of light to observe. These include the brightest Highlight. Then there are Midtones, the general color of the object. The Core Shadow is the darkest part of the object. Reflected Light is light bouncing back into the shadow area. The Cast Shadow is the shadow thrown by the object. Finally, there is the Occlusion Shadow. This is the darkest shadow where objects meet. Carefully observing these values adds realism. It helps your drawings pop off the page.
3. Negative Space
Negative space is truly powerful. It is the empty space surrounding your subject. Or it can be the space between parts of your subject. For instance, the gap between a chair’s legs is negative space.
Often, our brain focuses too much on the object itself. It labels it “chair” or “person.” But when you focus on the shapes of the negative space, something amazing happens. Your brain stops labeling. It just sees abstract shapes. Drawing these abstract shapes is often easier. It leads to more accurate placement of your main subject. This is because the shape of the negative space directly defines the object’s edges. So, draw the empty areas carefully.
4. Contour & Edge Quality
Contour drawing is about the outline of your subject. It captures the boundary between the object and its background. However, it’s more than just a simple line. Edge quality refers to how that line is drawn. Some edges are sharp and clear. Others are soft and fuzzy.
Varying your line weight adds depth. A thicker, darker line can suggest weight or closeness. A lighter, thinner line can suggest distance or delicacy. Focus on the actual edges. Also, observe how soft or hard those edges appear. This attention to detail brings life to your outline. It makes your drawing feel more substantial.
Essential Exercises to Train Your Eye
Now that we understand the pillars, let’s practice. These exercises are simple but incredibly effective. They will help train your artist’s eye.
1. Blind Contour Drawing
This exercise is fantastic for beginners. Its goal is to connect your eye and hand. Place your pencil on the paper. Choose an object to draw. Then, look only at the object. Do not look at your paper at all. Move your eye slowly along the edges of the object. Draw a continuous line as your eye moves. Your pencil should not lift off the page.
It might feel awkward at first. Your drawing will look strange, like a scribble. This is perfectly normal. The point is not a beautiful drawing. The point is to strengthen your observation skills. It forces your brain to truly focus on the contours you see. This develops a stronger visual connection.
2. The Grid Method (for Beginners)
The grid method is excellent for beginners. It helps ensure proportional accuracy. You need a reference image (a photo works well). Draw a grid over your reference image. Make sure the squares are equal. Then, draw a matching grid onto your drawing paper.
Now, draw your subject square by square. Focus on what each square contains. Copy the lines and shapes within each grid square. This breaks down a complex image. It turns it into many smaller, manageable parts. It removes the stress of getting the whole thing right at once. This method is a training wheel. It teaches you to see smaller relationships.
The grid method is highly effective for beginners. It simplifies complex proportions beautifully. For a deeper understanding of combining this grid technique with conceptual sketching, we recommend this guide. You can learn more about pencil conceptual sketching techniques here.
3. The 5-Minute Gesture Drawing
Gesture drawing is about capturing energy and movement. It is not about perfect detail. This exercise is usually done with figures. But it can be used for any moving subject. You work very quickly, for only 30 seconds to 5 minutes.
Your goal is to convey the overall pose or action. Focus on the flow and rhythm of the subject. Use loose, continuous lines. Don’t worry about erasing mistakes. Just keep your hand moving. This practice helps you loosen up. It improves your ability to see the essence of a form. It’s also a great daily warm-up.
4. Inverting the Image (or Drawing Upside Down)
This is a classic technique for accuracy. It works wonders for detailed drawings. Find a reference image or photo. Then, turn it upside down. Now, try to draw it.
What happens is remarkable. Your brain struggles to recognize the object. It stops labeling it “face” or “tree.” Instead, your brain just sees abstract shapes and lines. This bypasses the “symbol brain” we talked about. You are forced to draw exactly what you see. You stop drawing what you think you see. It’s a powerful trick for improving accuracy.
Beyond the Basics: Why It Matters for Imagination
Some artists only want to draw from their imagination. You might wonder, “Why do I need to draw from life?” The truth is, observational drawing is crucial even then. It forms the very foundation of your creative ability.
Think of it as filling your “visual library” or “mind palace.” Every time you draw from life, you are learning. You learn how light truly falls on a sphere. You learn how skin stretches over bone. You learn how objects recede into the distance. Without knowing these real-world rules, imagined scenes will often look flat or fake. Your imaginative drawings will have more realism. They will have more depth and believability. This happens because you have internalized the rules of reality. Learn the rules first. Then you can break them or stylize them with purpose.
Conclusion: Practice Makes the Artist
The journey to master observational drawing takes time. It requires patience and consistent practice. Remember, consistency is far more important than raw “talent.” Anyone can improve their drawing skills. It just takes the right approach and dedication.
Start small, start simple. Grab a pencil and a sketchbook. Find a simple object nearby-a shoe, a coffee cup, or even your hand. Don’t overthink it. Just observe it carefully. Then, try one of these exercises.
Suggestion: To keep your artistic journey consistent and to explore a wide range of subjects, try a practical tool. We recommend the GridSketcher app. This app lets you overlay a grid onto any photo you want to draw. It makes practicing proportion and measurement much easier and helps maintain daily practice.
Now, go forth and draw what you truly see! Share your progress in the comments below. What object will you draw first?
