Adding shading is like giving your drawing a heartbeat. It brings life, depth, and emotion to even the simplest shapes. Whether you’re drawing a face or a flower, shading helps your sketch stand out.
But for beginners, shading can feel tricky. Where does the shadow go? How do you make it look smooth? The good news is – there are simple techniques that make it much easier. One of them is using a grid drawing method. It can guide your shading and improve your control.
Why Shading Matters More Than You Think
You might think outlines are enough. But shading is what gives your drawing a three-dimensional feel. It shows where the light hits and where it doesn’t. Without shading, everything can look flat.
Think of a cartoon face versus a realistic sketch. The difference usually comes from proper shading. Even with a basic pencil, the right shading can make your drawing pop. Practicing different styles also helps you develop your unique artistic touch.
Learn to See Light and Shadow Clearly
Before you even pick up a pencil, take a moment to observe your subject. Where is the light coming from? What side is darker? Understanding this helps you plan your shading in advance.
Here are some quick tips:
➲ Use one light source while sketching, like a lamp.
➲ Look for the darkest and lightest parts first.
➲ Practice with simple shapes like spheres and cubes.
➲ Try taking a photo to line drawing to clearly see shadows and highlights.
➲ Mark the light and dark areas lightly before shading.
This habit builds your observation skills and makes every sketch more accurate.
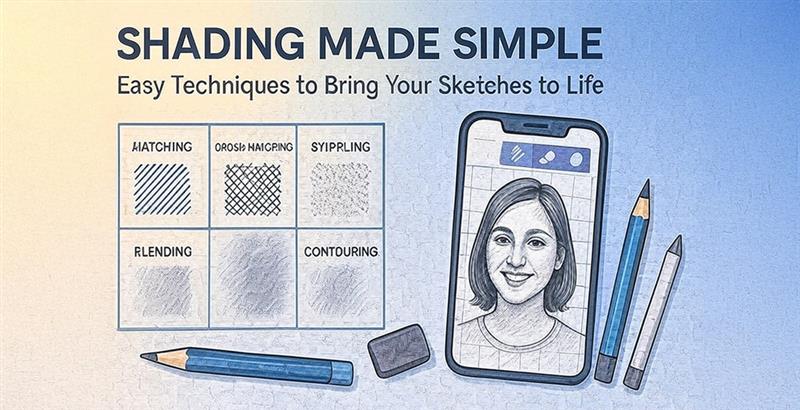
Start with Hatching for Bold, Textured Shading
Hatching is one of the easiest ways to shade. It’s done using straight lines placed close together. This gives your sketch a textured, artistic feel.
You can change the effect by adjusting the line direction or spacing. Want darker shadows? Draw more lines close together. Want a lighter tone? Leave more space between lines.
To get better at hatching:
➲ Start with vertical lines, then try diagonal.
➲ Practice changing the angle to match object curves.
➲ Use a drawing app to explore hatching digitally.
➲ Don’t press too hard; control matters more than pressure.
➲ Try cross-hatching by layering lines at different angles.
Hatching is great for adding drama and contrast to your work. It’s also ideal for hair, clothing, and textured areas.
Use Gradation to Create Soft, Smooth Transitions
Now let’s talk about something softer – gradation. This is where shading moves smoothly from dark to light. It works beautifully for faces, clouds, or anything soft and rounded.
You don’t need fancy tools to try it. Just use your pencil gently and build the tone gradually. It’s all about blending.
Here’s how to practice:
➲ Start with a simple shape, like a circle.
➲ Shade one side dark and fade it gently to light.
➲ Use your fingertip or blending tool for smoother results.
➲ Layer your pencil strokes instead of pressing hard.
➲ Erasers can also lighten areas and fix mistakes.
Gradation takes time and patience, but the result is worth it. It makes your sketch feel more realistic and emotional.
Let the Grid Be Your Guide While Shading
Using a grid does more than help you draw accurate outlines. It also helps with your shading placement. When each part of your drawing is in a box, it’s easier to focus.
Many beginners struggle with shading the right spot. But with a grid drawing technique, each square helps guide where the shadows go.
Tips for using grids effectively:
➲ Divide your reference photo and paper into equal boxes.
➲ Shade each square individually while keeping the big picture in mind.
➲ Zoom in on one square at a time for better control.
➲ Match the tones of your reference as closely as possible.
➲ Take breaks to check your overall progress.
Grids are especially helpful when doing photo sketch conversion work. They ensure that every little detail lines up perfectly and looks real.

A Simple Step-by-Step Sketching Practice You Can Try
Now that you’ve explored both hatching and gradation, it’s time to try them out together. Practicing with basic shapes is one of the easiest and most effective ways to improve your shading skills. This exercise helps you understand how light interacts with form, how shadows fall, and how different shading techniques can work side by side. Whether you’re using pencil and paper or a drawing app, this routine is perfect for beginners and helpful for building confidence.
- Choose a reference photo of an apple or a sphere.
- Convert the photo to line drawing or sketch it using a grid.
- Decide where your light source is – top left, for example.
- In the dark area, use hatching to add a bold shadow.
- Near the light, apply soft strokes for gradation.
- Blend lightly with your finger or blending tool.
- Step back and check if the light and dark balance well.
- Add more contrast or erase gently for highlights.
Practicing this way regularly sharpens your observation and control. Over time, you’ll begin to notice how light behaves on different surfaces. You’ll also feel more confident combining both photo sketch conversion and grid drawing techniques into one cohesive piece. It’s a small, manageable habit – but one that builds the foundation for more advanced artwork later on.
Read our blog on “15 Simple Ways to Create Depth and Realism in Drawings” to learn more about bringing your sketches to life.
Common Mistakes to Avoid as You Learn
Even with practice, it’s easy to fall into some common shading traps. These little mistakes can affect the overall look of your sketch without you even realizing it. The good news? Most of them are easy to fix once you’re aware of them. Let’s go over a few things to keep in mind.
➲ Don’t press too hard too soon – build your tones.
➲ Avoid smudging everything; use blending with purpose.
➲ Don’t ignore the light source; it guides all shading.
➲ Stay patient – gradual buildup gives the best results.
➲ Don’t forget to use grids when practicing more complex subjects.
These small habits make a big difference as you improve your shading. Being mindful of them not only helps you avoid frustration but also leads to more controlled, confident sketching over time.
Let Your Sketch Speak with Shading
The best sketches often say more with shadows than lines. Whether you’re using hatching or gradation, both styles add personality and mood. Sometimes, one sketch uses both styles to great effect.
Try adding grids to your sketching routine. It’s a small step that makes a big difference. Every square gives you a better grip on the overall shape and shading. Whether you’re sketching by hand or using a drawing app, mastering shading techniques takes your art to the next level.
If you’re looking for a tool that makes shading practice easier, Gridsketcher is worth checking out. It helps you turn your favorite photo to line drawing, apply grids, and explore shading all in one place. Whether you’re just starting or refining your style, having the right guide makes all the difference.
